Workflow Demo
- Click tabs to switch windows in a zone
- Drag tabs between zones to rearrange
- Tab groups activate linked windows across panes
Space Rocks
↑
Try it — click or drag the tabs above
UltraSnapper (Beta)
Tabbed window snapping for macOS. Try the interactive demo — tap a feature to explore:
With basic customization
↔ Drag tabs between panes to rearrange
⊕ Right-click any tab to move or assign groups
◆ Grouped tabs activate together across panes
Getting Started

- Download — download UltraSnapper.zip and unzip it to reveal the app.
- Install — drag UltraSnapper to your Applications folder and double-click to launch.
- Grant Accessibility — UltraSnapper needs Accessibility permission to move and resize windows. You'll be prompted on first launch.
- Pick a layout — click the menu bar icon and select a grid layout. Windows snap to these zones as you drag them.
First Launch

- On first launch, macOS asks you to grant Accessibility access.
- Open System Settings > Privacy & Security > Accessibility and enable UltraSnapper.
- You may need to restart UltraSnapper after granting permission.
- Once enabled, the UltraSnapper icon appears in your menu bar — you're ready to go.
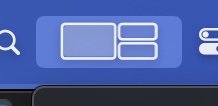
Status Bar Menu
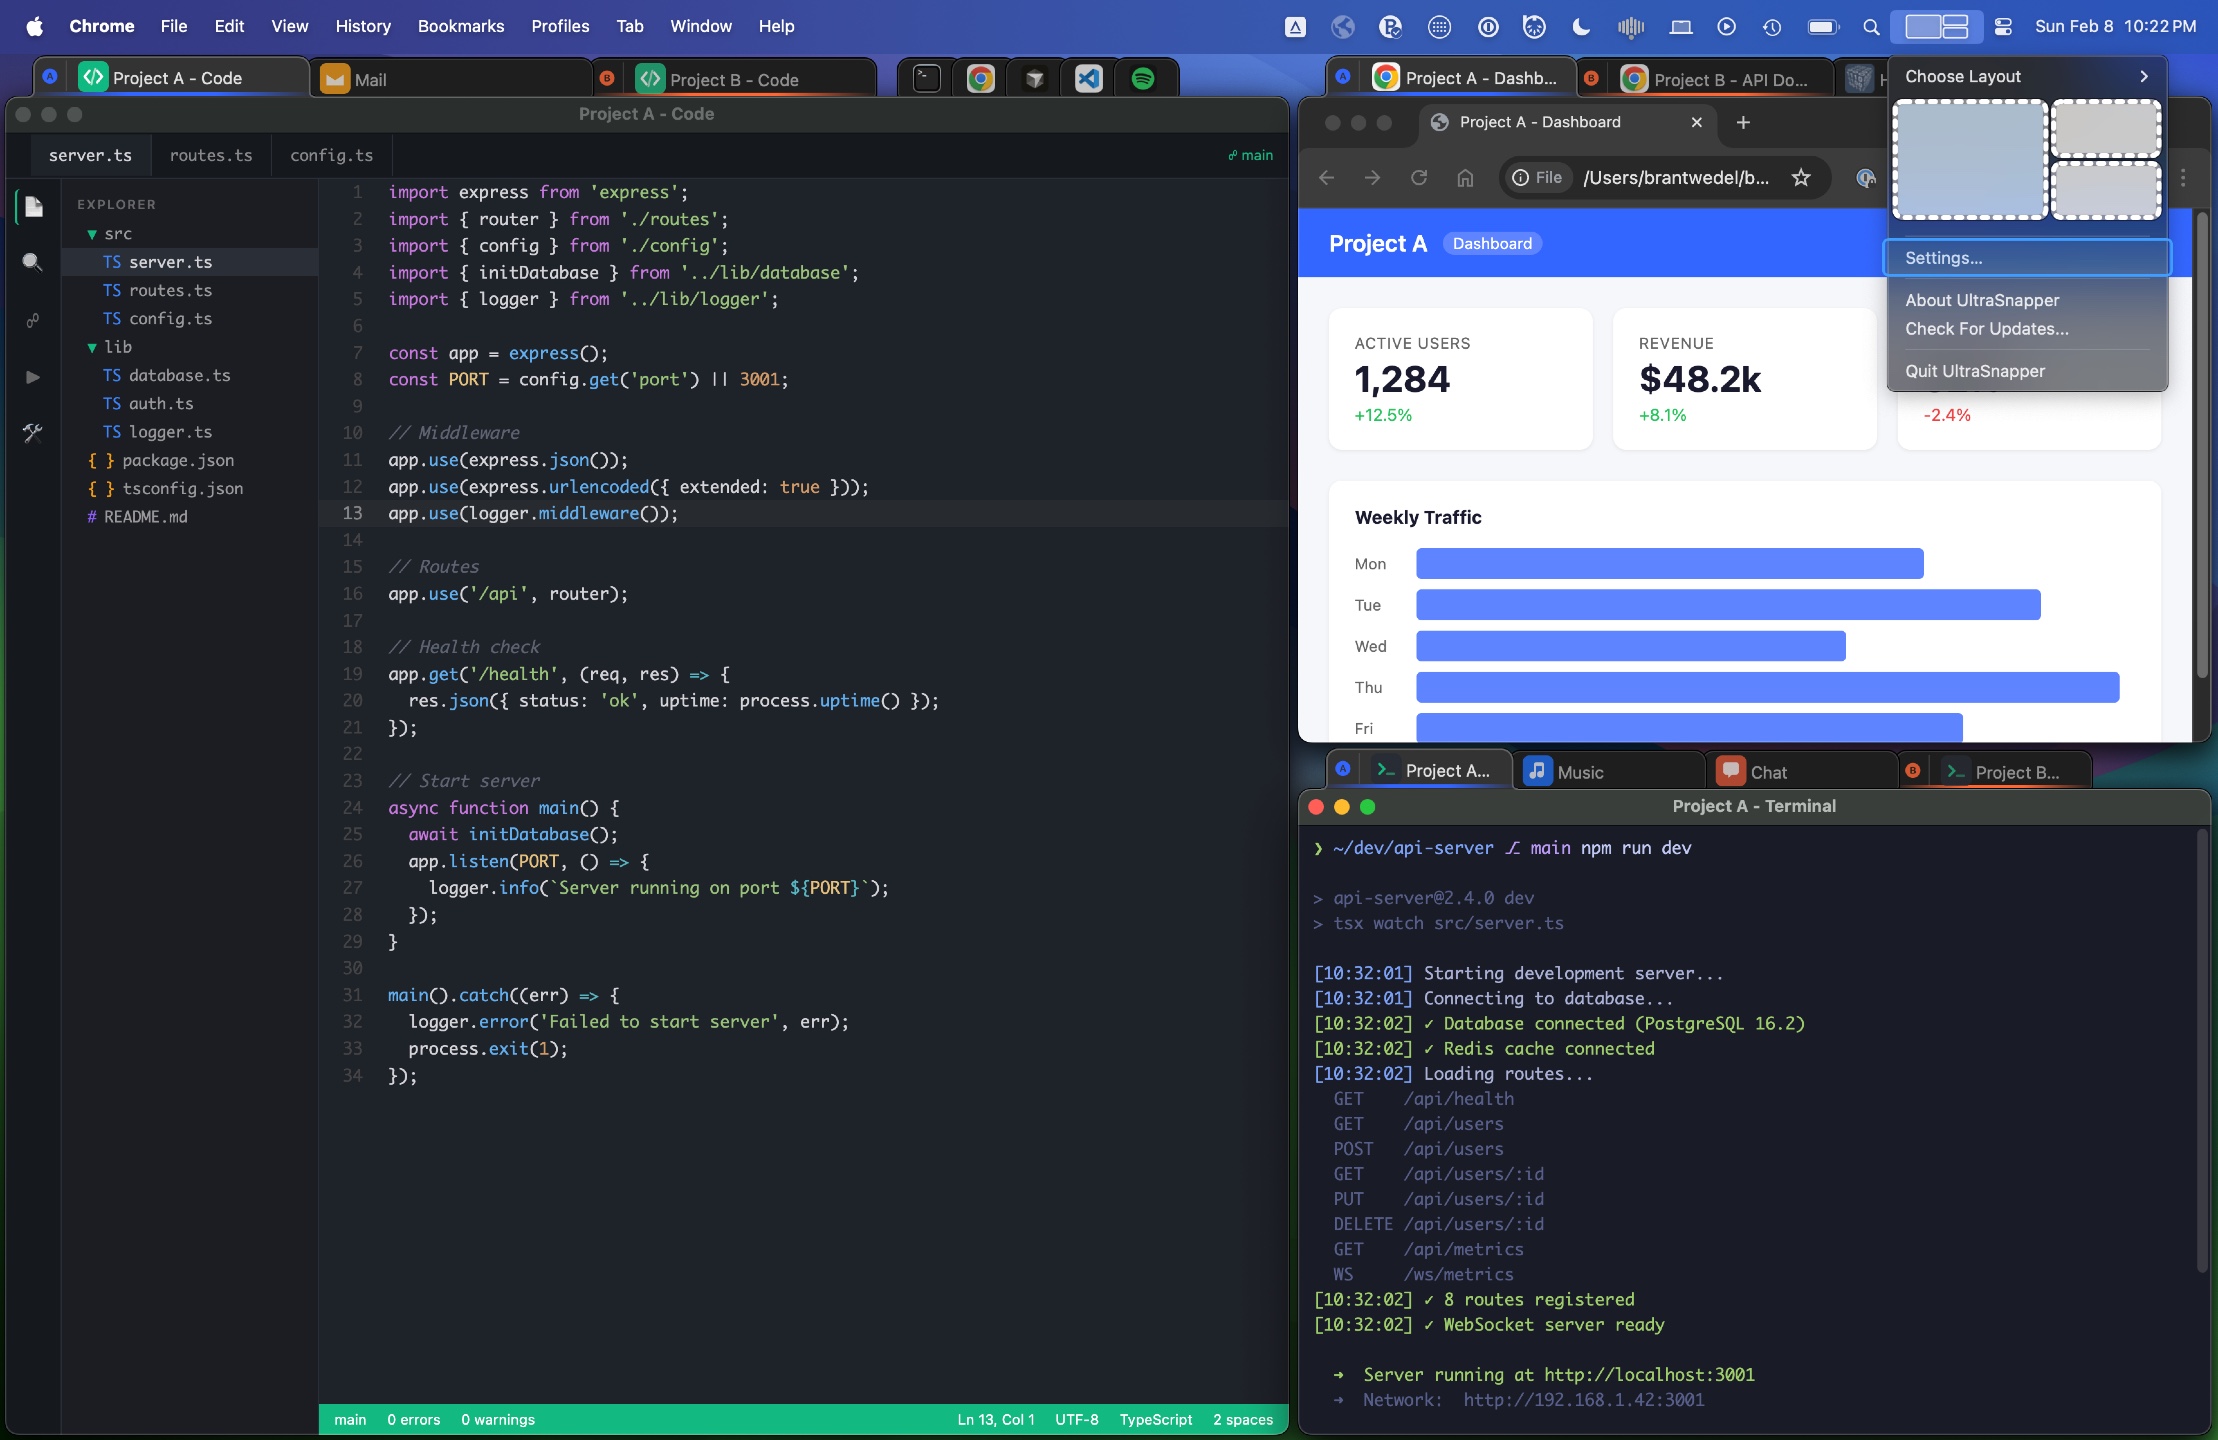
- Click the menu bar icon to see your 4 layout slots with grid previews.
- The active layout is highlighted — click another to switch instantly.
- Access Preferences, check for updates, or quit from this menu.
Window Snapping
- Edge snapping — drag a window to screen edges for quick half-screen or full-screen positioning.
- Area snapping — drag a tab over any grid zone to snap it into place, no need to aim for screen edges. Hold Option while dragging a window to activate area snapping on demand.
- Top edge maximizes — dragging to the top edge maximizes the window regardless of layout.
Snap Guides
- A translucent overlay appears as you drag, showing exactly where the window will land.
- The overlay matches the shape of the target zone in your current layout.
- Release while the guide is visible to confirm the snap.
Combine Areas

- Drag a window between the edges of two adjacent zones to snap it across both, filling the combined area.
- Useful for giving one window extra space while keeping other zones available.
Area Snapping Modes

- Near Grid — area snapping activates when dragging near a grid zone boundary.
- All Windows — area snapping activates anywhere over visible windows, including when dragging windows (not just tabs). Pro
- When Dragged vs Always — When Dragged only snaps while you're dragging. Always keeps all windows snapped to the nearest grid zone at all times. Pro
Padding

- Area padding — add a gap between snapped windows (None, 2pt, 4pt, 6pt, 8pt, 10pt, 20pt, 30pt, 40pt, or 50pt). Pro
- Edge padding — add a margin between windows and the screen edges. Pro
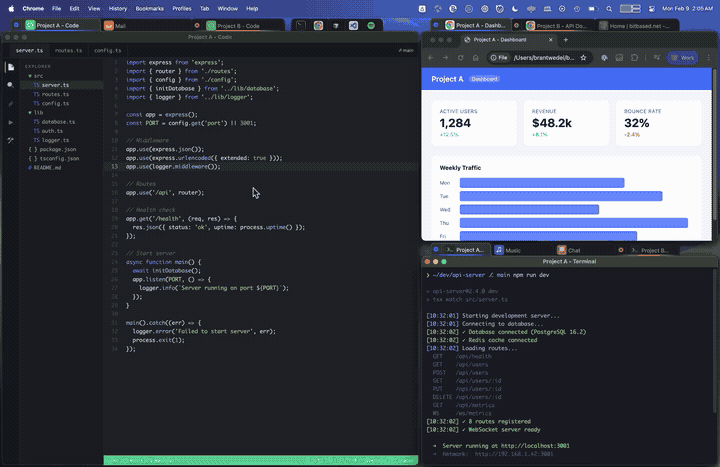
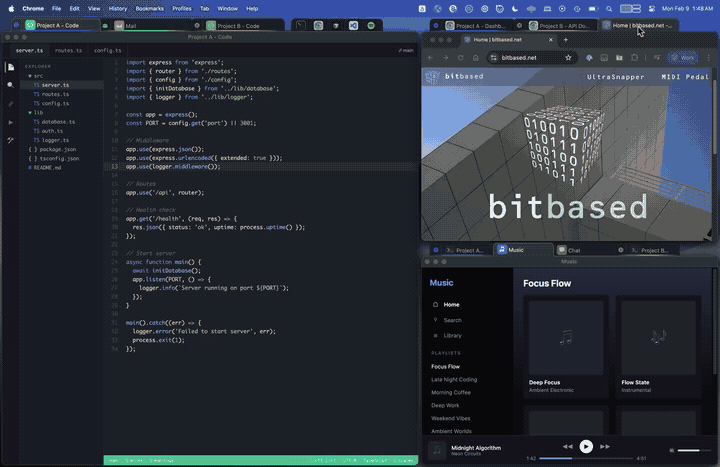
Tabbed Windows

- Tab bar — a tab bar appears above each layout zone, showing the windows snapped to that area.
- Click a tab to bring that window to the front. Tabs show the window title and app icon.
Browser Tab Detection
- UltraSnapper detects the active tab in Chrome, Firefox, and Safari.
- The browser's current tab title is shown in the UltraSnapper tab bar, so you can identify which page is open at a glance.
- Website favicons can be displayed alongside the tab title. Pro
Dock Apps

- Show tabs for apps from the macOS dock, even if they aren't open yet.
- Click a dock app tab to launch it or bring it to the front.
- Filter which dock apps appear: All Apps, Unopened Apps, Active Apps, or Pinned Apps. Pro
Tab Bar Options
- Show minimized windows — include minimized windows as tabs for quick access. Pro
- Fixed-width tabs — give all tabs equal width instead of sizing to fit their title. Pro
- Tab height — choose Small, Medium, or Large. Pro
- Render above shadows — draw tabs above the window shadow layer so they aren't obscured. Pro
Tab Groups
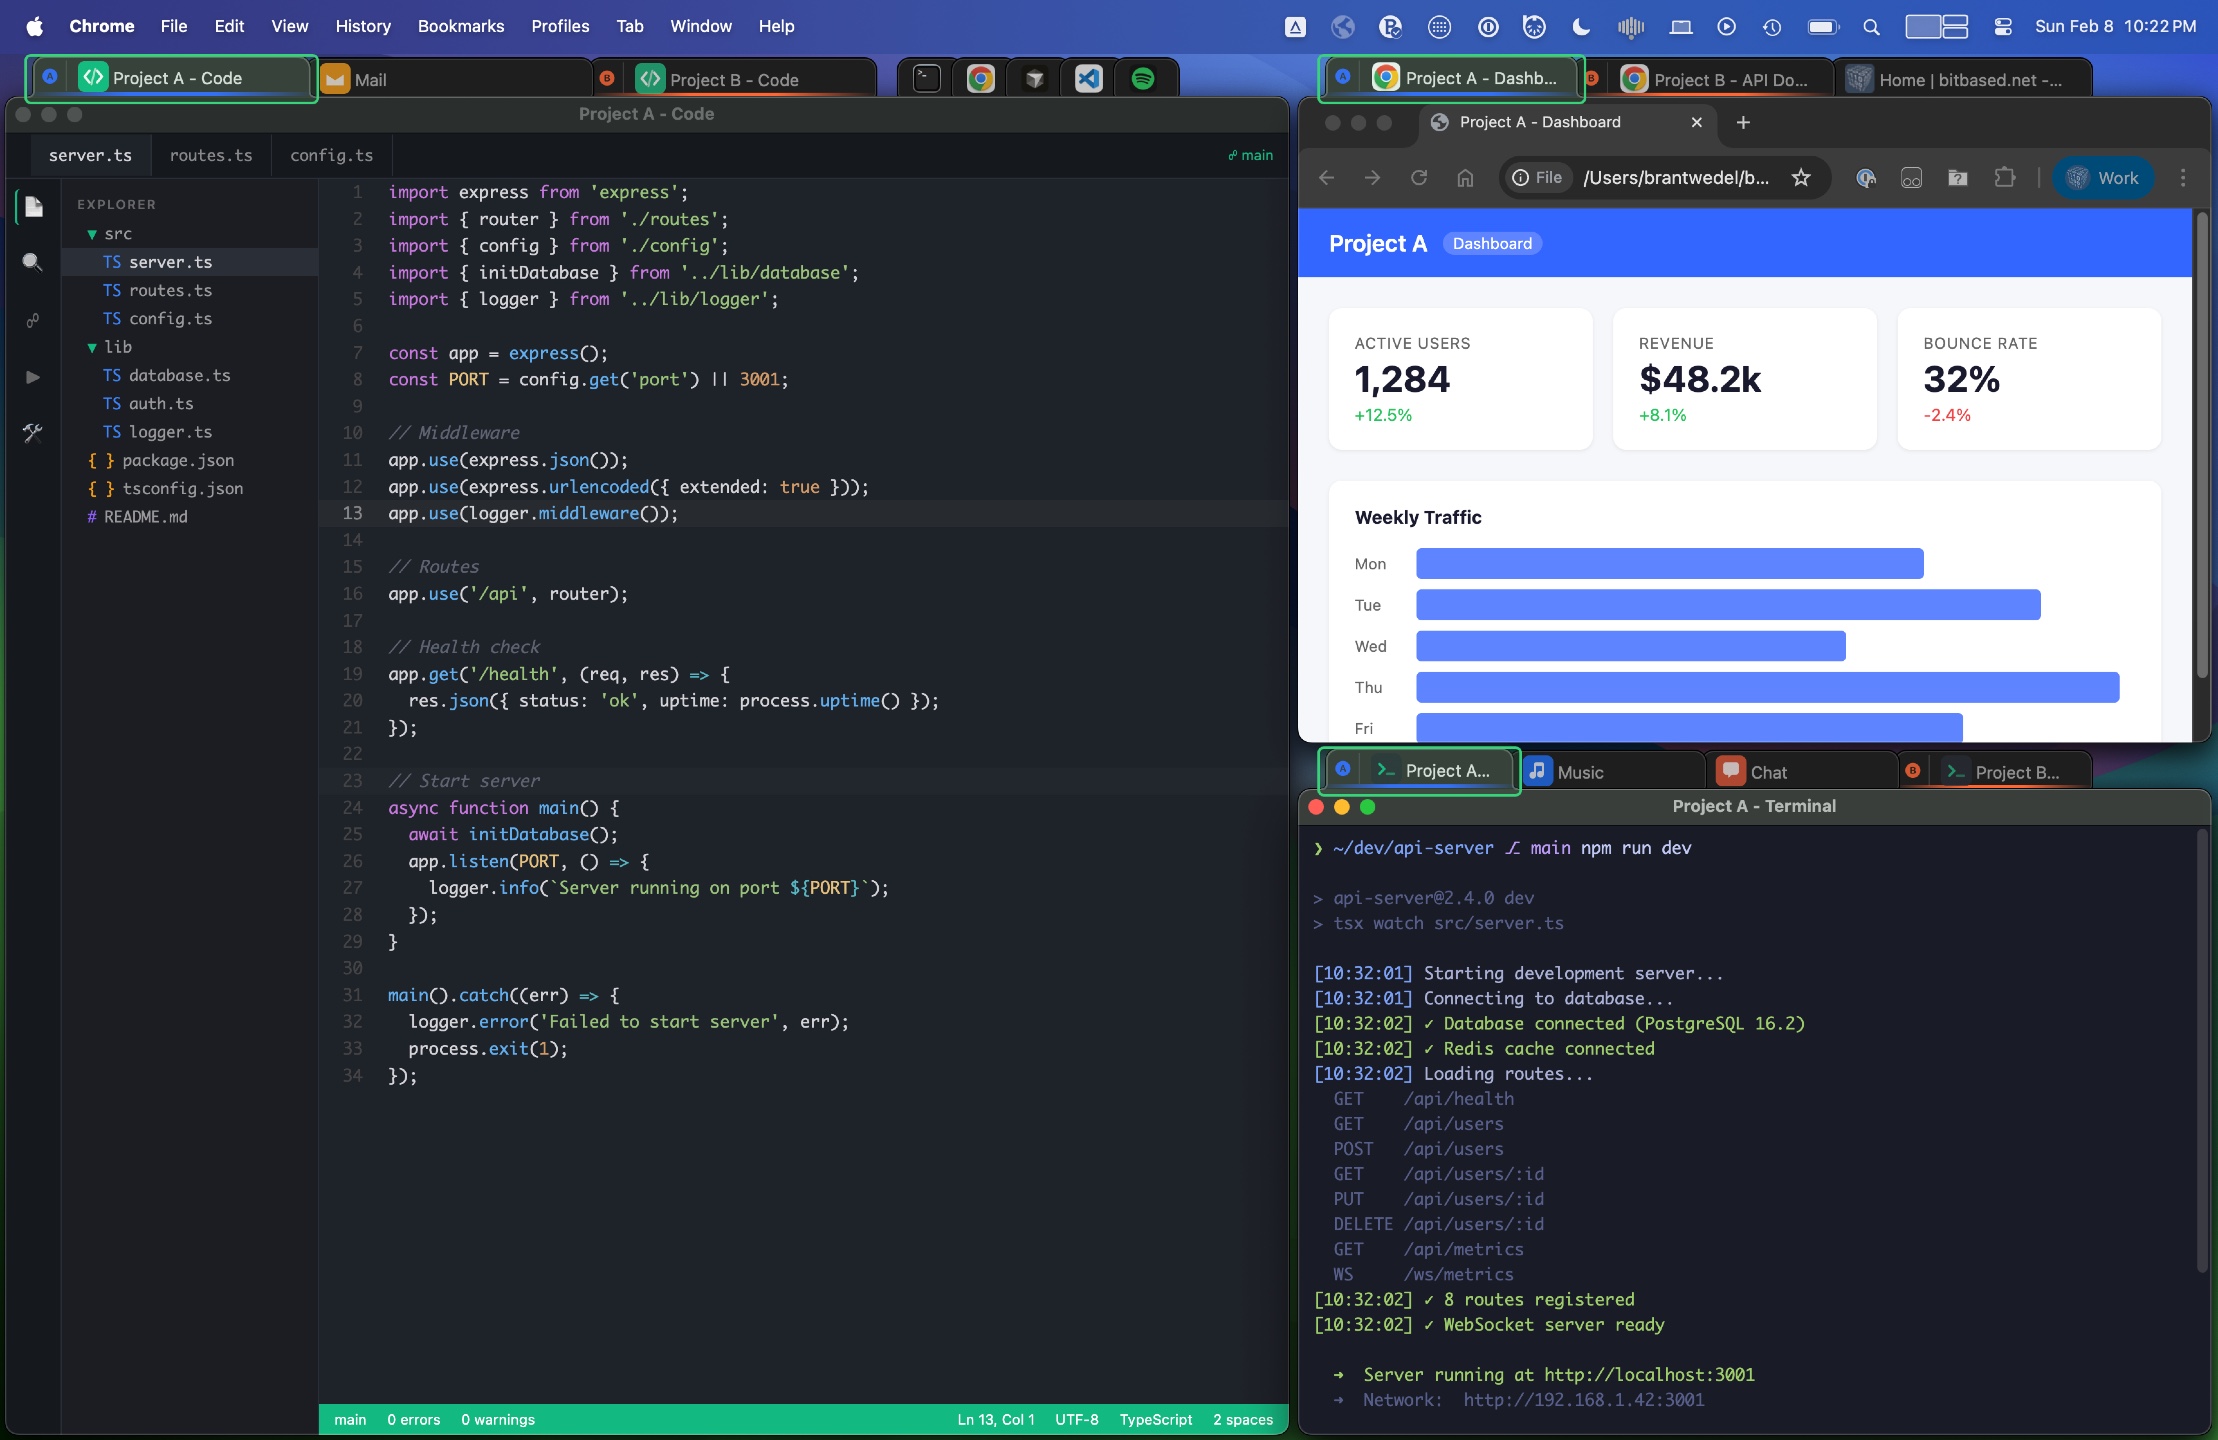
- Create a group — right-click any tab and assign it to a group with a color and name.
- Linked activation — clicking one grouped tab activates all tabs in that group across every pane. Perfect for project-based workflows.
- Each group has a name, color, and optional icon (emoji or SF Symbol).
Managing Groups
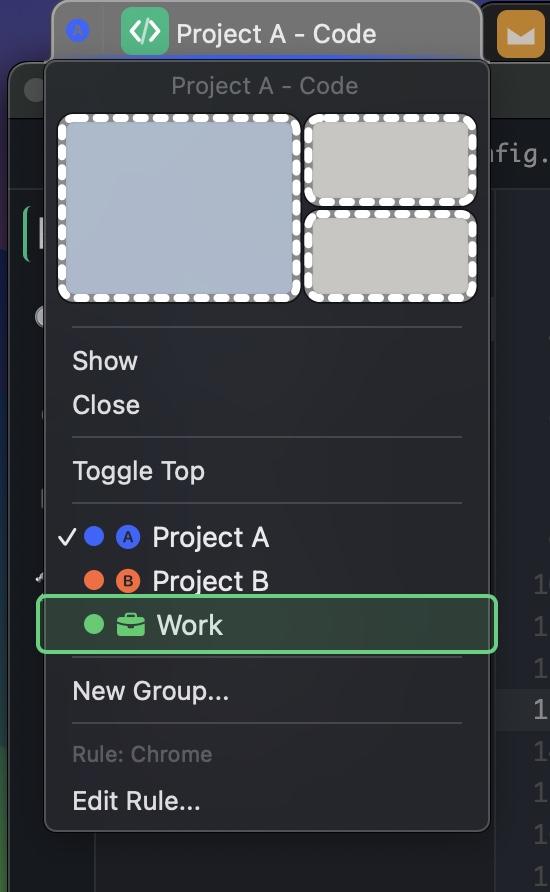
- Right-click a tab to assign, reassign, or remove it from a group.
- Each group gets a colored dot and underline on its tabs for quick identification.
- Remove a tab from its group by selecting No Group in the context menu.
Custom Icons
- Add an emoji or SF Symbol icon to any group for at-a-glance recognition.
- Set icons when creating or editing a group in the group settings.
Display Options
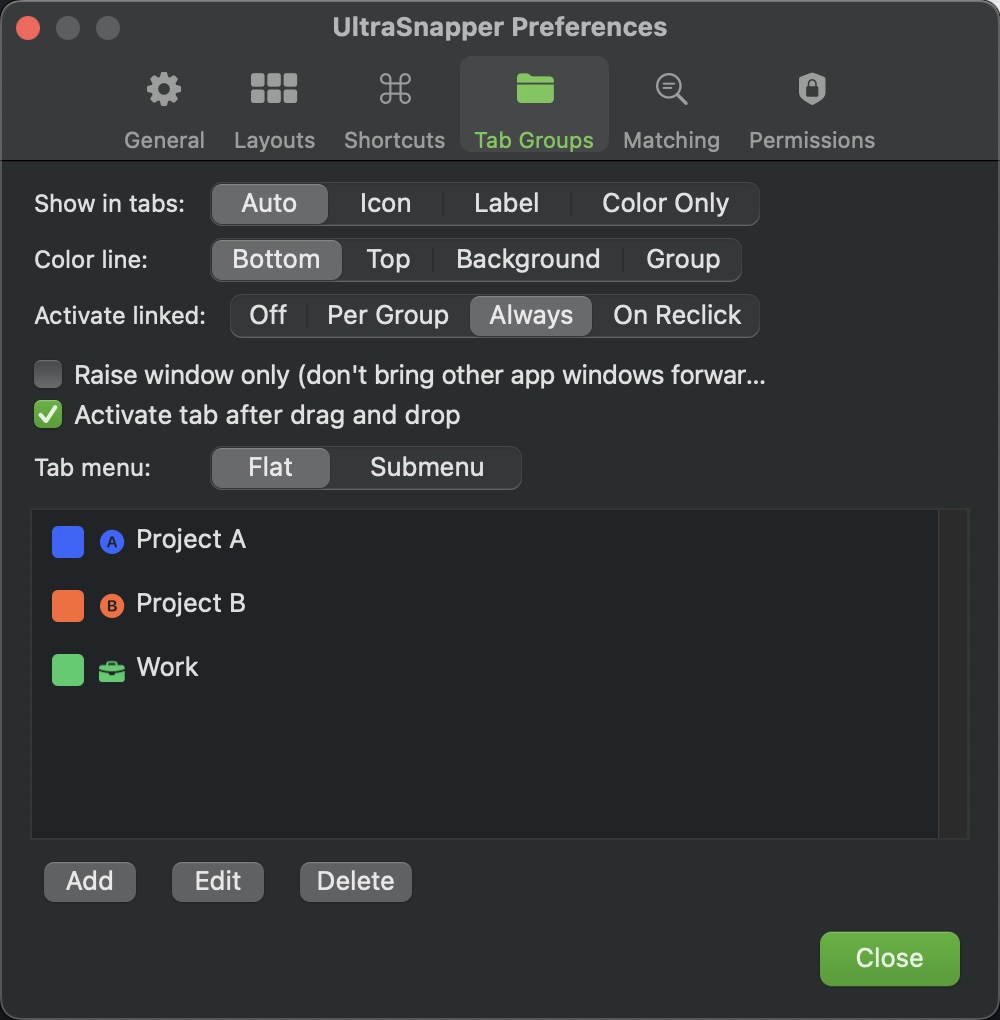
- Show in tabs — choose how grouped tabs appear: Auto, Icon, Label, or Color Only. Pro
- Color line — pick where the group color indicator shows: Bottom, Top, Background, or Group. Pro
- Tab menu — choose between Flat or Submenu style when right-clicking to assign groups. Pro
Linked Activation

- Off — clicking a grouped tab only switches that tab; other group members stay as they are.
- Per Group — each group can individually enable linked activation in its settings.
- Always — clicking any grouped tab activates all members of that group across panes.
- On Reclick — linked activation only triggers when clicking an already-active grouped tab.
- Raise window only — when activating linked tabs, only raise the target window instead of bringing all of that app's windows forward.
Custom Layouts
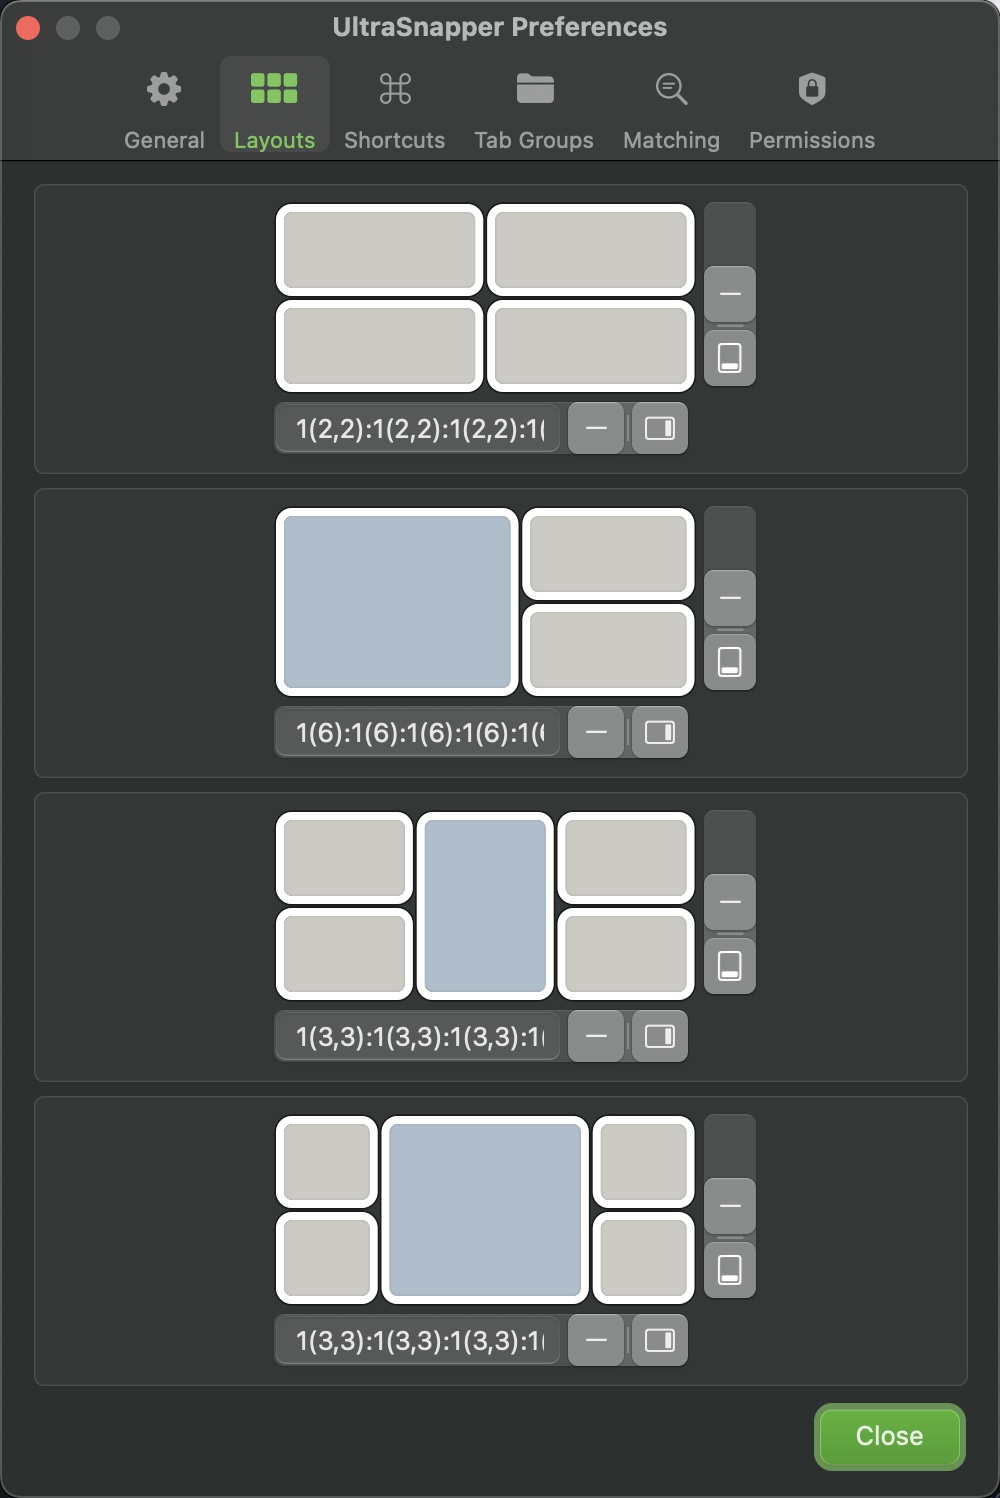
- 4 layout slots — configure up to 4 different grid layouts and switch between them from the menu bar.
- Grid split system — layouts are built by splitting and joining rows and columns to create panes.
- Layout customization requires Pro.
Splitting & Joining (Pro)

- Split a pane — select a zone, then split it horizontally or vertically to create two new zones.
- Join panes — select adjacent zones and join them back into a single larger zone.
- Build any arrangement from simple halves to complex multi-column layouts by combining splits.
Multi-Monitor

- Assign a different layout to each monitor in a multi-display setup.
- Each screen's layout is remembered and applied automatically when the monitor is connected.
Layout Preview
- The menu bar icon shows a miniature preview of your active layout.
- Quickly see which layout is in use without opening the menu.
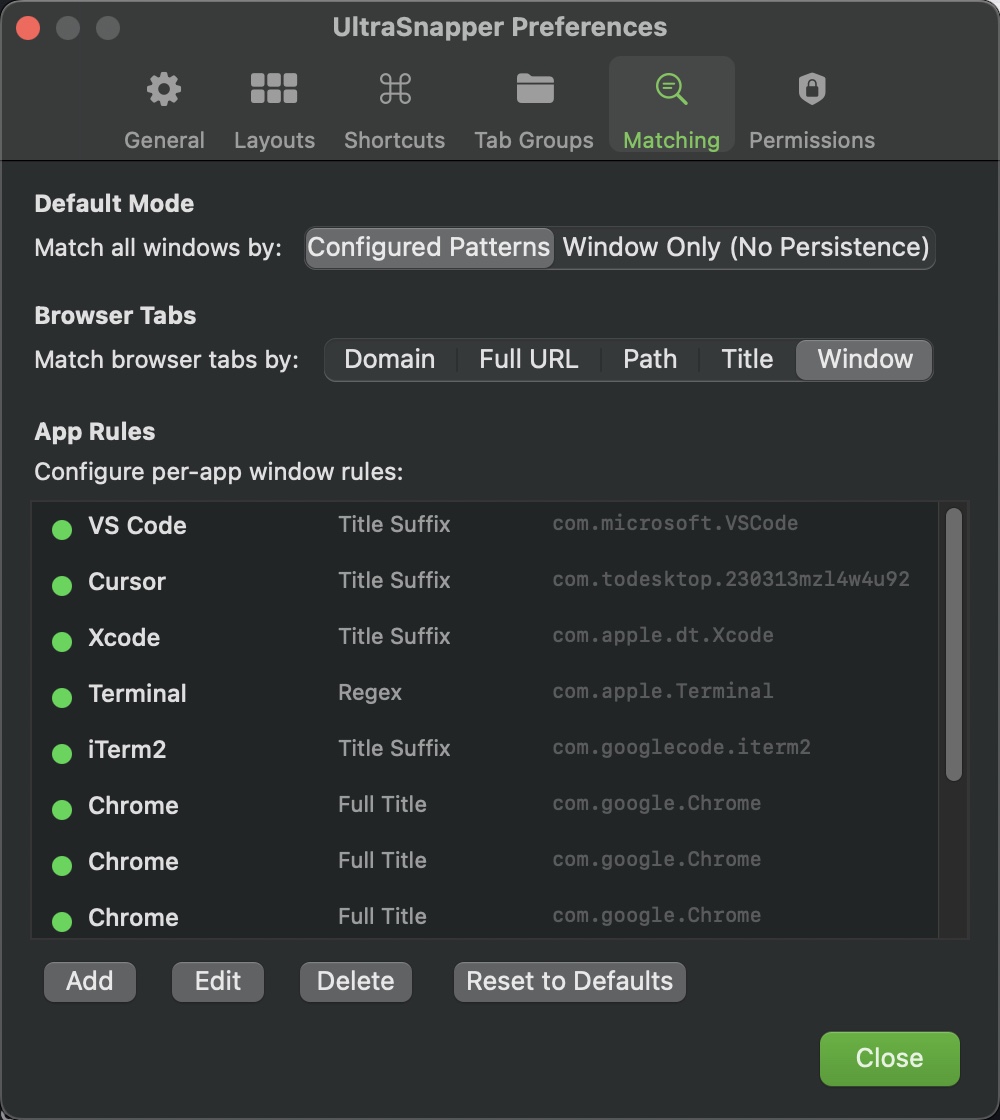
Window Matching

- App rules — control how UltraSnapper identifies and handles windows from specific apps. Pro
- Match type — choose how window titles are parsed: Full Title, Title Suffix (text after the last dash), or Regex (custom pattern with capture group).
- Filter — optionally filter which windows a rule applies to by title, using a contains search or regex.
- Configure rules in Preferences > Matching.
Behavior Flags
- No Tab — hide matching windows from the tab bar entirely. Useful for utility windows or panels you don't want cluttering your tabs.
- No Snap — allow tabs but only reposition the window when snapping (no resize). Good for windows that need a fixed size.
- Match by Window — use session-only matching so the window's identity doesn't persist across app restarts.
Auto-Assign Tab Groups

- Each rule can automatically assign matching windows to a tab group.
- Set a tab group in the rule editor and any window that matches will join that group when it appears.
- Manually reassigning a window to a different group overrides the rule for the rest of the session.
Browser Tab Matching

- A separate setting controls how browser tabs are matched across sessions.
- Choose from Domain, Full URL, Path, Page Title, or Window (session only).
- Set in Preferences > Matching.
Default Rules
- UltraSnapper ships with rules for common apps like VS Code, Cursor, Xcode, Terminal, and iTerm2.
- These use title suffix or regex matching so each project window gets its own tab identity.
- Reset to defaults at any time from the Matching preferences.
Preferences

- The General tab contains all snapping, tab, and visual settings in one place.
- Hold Option while opening the General tab to reveal advanced settings.
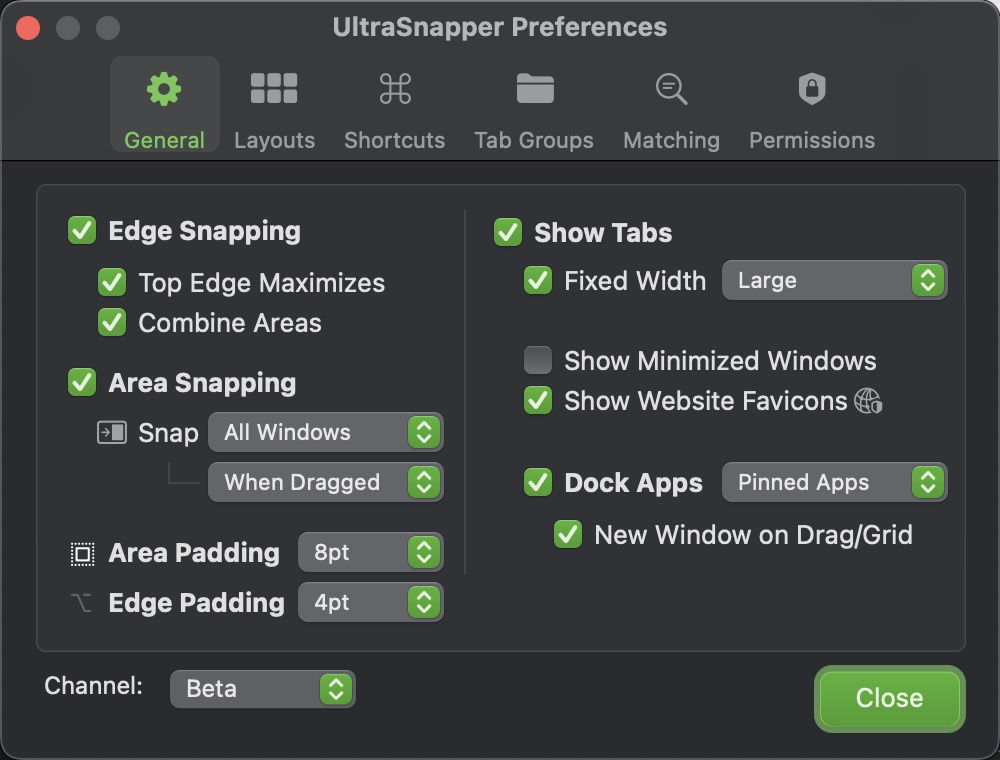
Edge Snapping
- Edge Snapping — master toggle for snapping windows when dragging to screen edges.
- Top Edge Maximizes — dragging to the top edge maximizes the window regardless of layout. Pro
- Combine Areas — snap a window across two adjacent zones by dragging between their edges. Pro
Area Snapping
- Area Snapping — master toggle for snapping by dragging over grid zones (not just screen edges). By default activates when dragging tabs.
- Snap — Near Grid activates near grid zone boundaries; All Windows also activates when dragging windows. Pro
- When Dragged vs Always — Always automatically snaps windows to the nearest grid zone when created or moved. Pro
Padding
- Area Padding — gap between snapped windows (None, 2pt, 4pt, 6pt, 8pt, 10pt, 20pt, 30pt, 40pt, or 50pt). Pro
- Edge Padding — margin between windows and screen edges (None, 0pt, 2pt, 4pt, 6pt, 8pt, 10pt, 15pt, 20pt, 25pt, 30pt, 40pt, or 50pt). Pro
Tab Settings
- Show Tabs — master toggle for the tab bar above each layout zone.
- All Spaces / Main Space — show tabs on all virtual desktops or only the main one. Pro
- Fixed Width — give all tabs equal width instead of sizing to title. Pro
- Tab Size — choose Small, Medium, or Large. Pro
- Render Tabs Above Shadows — draw tabs above the window shadow layer so they aren't obscured. Pro
- Show Minimized Windows — include minimized windows as tabs. Pro
- Show Website Favicons — display favicons for browser tabs. Pro
Dock Apps
- Dock Apps — master toggle for showing tabs for apps from the macOS dock.
- Filter — choose which dock apps appear: All Apps, Unopened Apps, Active Apps, or Pinned Apps.
- New Window on Drag/Grid — open a new window when dragging a dock app tab into a zone. Pro
Layouts (Advanced)
- Save — how layouts are saved: Display (default), Resolution, or Arrangement. Pro
- Selection — layout selection scope: Each Screen (default) or All Screens. Pro
Keyboard Shortcuts

| Action | Shortcut |
| Move window left | Ctrl Option ← |
| Move window right | Ctrl Option → |
| Move window up | Ctrl Option ↑ |
| Move window down | Ctrl Option ↓ |
| Next window (tab) | Ctrl Option Tab |
| Next area | Ctrl Option A |
Customization
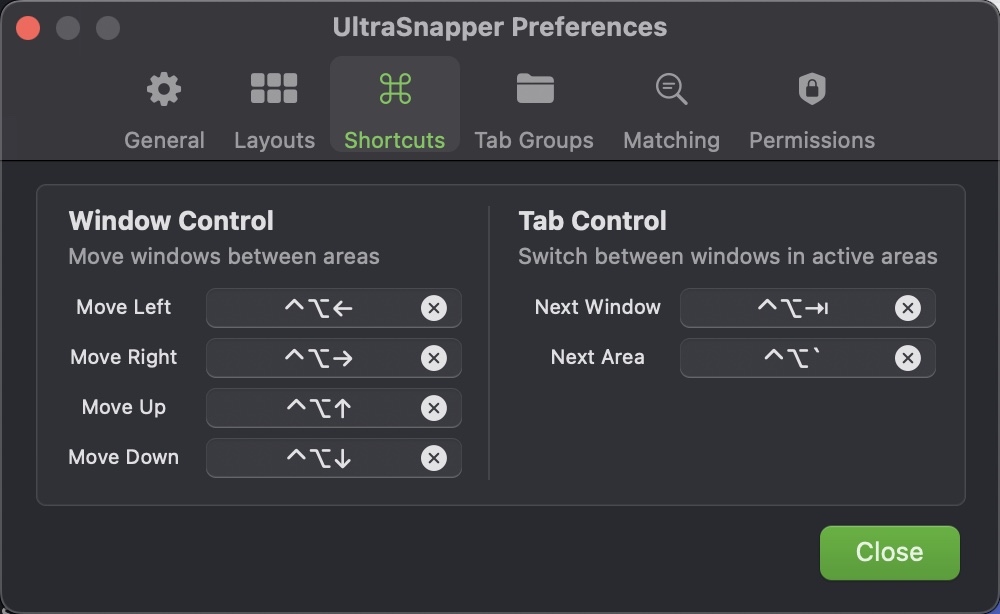
- All shortcuts can be changed in Preferences > Shortcuts.
- Click a shortcut, then press your preferred key combination to reassign.